Monday, September 13, 2010

Happy Fall Y'all!

Sorry for the cheesy title, but I knew I had to break it out somewhere! :) Let's just say it has been a true, blue Monday around here. Aren't we all a little frazzled when we start off the week? Whew. Thank goodness for Tuesdays to help us move on from Mondays!

With that said, I wanted to (finally!) share some of my fall decorations. Some of it is hand-made and some if it is store-bought. Or, if you're my mom, it's all "made" in the sense that "I made it to the store and back!"

Unfortunately, many of these pictures aren't of the best quality. I'm away at work during the day so I don't always have the best picture-taking conditions (obvious photo tip from Michelle: 11 PM when it's pitch black dark outside is not a good time to take pictures without a flash!). Hopefully they turned out half-way decent.

Without further introduction... the fall collection :)

homemade wreath on our front door
I actually made this wreath a couple of years ago, at our old house. I didn't want to spend $50 on one of the beautiful wreaths at Hobby Lobby, so I made my own for about $12. All it took was a wire wreath and a few strands of fall greenery. Even though I made it a few years ago, doesn't it look absolutely perfect with the red front door on our house now?! Love it! (PS- I spy a couple of puppy dogs peeking through the front door! They're probably thinking WHAT is she doing??!)

homemade front door wreath close-up

Hobby Lobby pumpkin

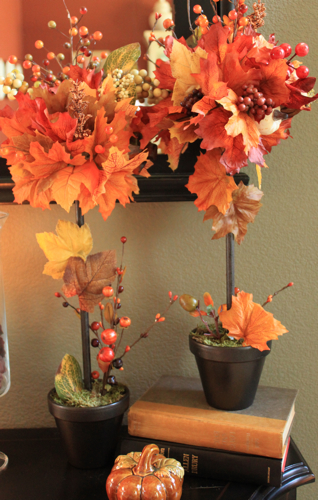
homemade fall leaf arrangement on right wall

homemade fall leaf arrangement close-up
This little guy was just a sparkly bunch of leaves ($3, Hobby Lobby) and a wicker sconce ($3, Hobby Lobby) all found in the floral department.

fall mantle in our living room

I made the potted arrangements on the right of the mantel by sticking some wiry fall greenery into a couple of wicker potpourri balls. Then I just rested them on top of some plainjane flower pots and poof! you've got a decoration.

fall mantle close up

fall mantle close up

Again, sorry for the poor picture quality! Now all I need is a pumpkin spiced latte and some pumpkin cake and we're good to go!

Linked to:
http://www.skiptomylou.org/
Making the World Cuter
http://craftskeepmesane.blogspot.com/
http://theinspiredroom.net/
http://todayscreativeblog.net/
http://somedaycrafts.blogspot.com/
http://www.bluecricketdesign.net/
http://thisblessednest.blogspot.com/
http://www.thethriftyhome.com/
http://www.centsationalgirl.com/
http://hookedonhouses.net/
http://www.thenester.com/
Tater Tots & Jello

Visit thecsiproject.com

Sunday, September 12, 2010

Weekend Warriors

What do you get when you tear out this old rotting wood fence...


this dilapidated playset....


and this old-school bathroom?


 The answer?


A really big pile of junk in our backyard and a really, really big mess for me and the hubs to clean up.

Now that we've finished our master bathroom demolition, it's time to get all of this junk over to the landfill. So we ordered a gigantic dumpster to help us with that task. Here she is after about 6+ hours of hauling the junk from our backyard to the dumpster (which, by the way, is in our driveway... I'm sure our neighbors love that!).


I have never loathed a dumpster so much in my life. But check out our progress! The dumpster is pretty full after just one day's worth of work for two people! And I have to admit that I'm a little excited that we no longer have gigantic piles of wood/tile/concrete/other construction debris in our backyard. The bad part? We've only got until Thursday to fill this sucker up to the brim.

My. Arms. Are. Jello. Whose idea was it to do this renovation stuff, anyways?!! Ahem, sooo maybe I begged and pleaded to start the renovations but I envisioned tiling and vanities, not dumpsters!! I guess we'll get to that sooner than later. Oh well, have a blessed Sunday, everyone!

Wednesday, September 8, 2010

Featured Projects: Fall Decor

In case the mound of rubble in my master bathroom didn't give it away, I've been slightly preoccupied with our bathroom renovations this week. Oh yes, and that 13 hour work day I had yesterday. Phew. Even though fall is my FAV-OR-ITE season, I haven't had a chance yet to break out all of my fall decor. Well, that and the fact that I'm lacking a little motivation because the weather here in Georgia isn't incredibly fall-ish (hellooo 91 degrees today!). 

But many of you out there in the blogging world have already gussied up your homes with some beautiful autumn decorations. I can't even believe how creative some of you ladies get! Here are some of my favorites.

Pine Cone Fall Mantle from Tracy's Trinkets and Treasures
DIY Fall Topiaries from Decor Chick
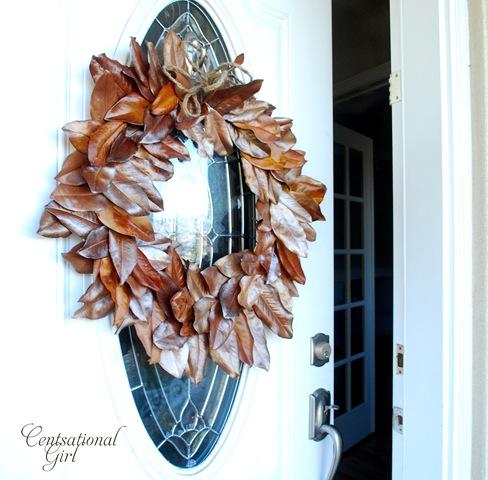
Magnolia Wreath from Centsational Girl

Adorable Stuffed Owl from Pony Tails & Fish Scales

Fall Wreath from Crafty Land

Silver Pumpkins from Hooked on Houses
DIY Fall Wreath from Burns House
Fall Mantle from Sweet Something Design
Fall Pillows from Tatertots & Jello

Chocolate Chip Pumpkin Muffins from Orange It Lovely
Sooo maybe those muffins aren't decor... but they look amazing! I looove pumpkin flavored stuff. Just wait till I share my world-famous pumpkin cake recipe later in the season.... MMMM! Thanks for all of your creative ideas! Feel free to comment with a link to your newest fall project- the more inspiration, the merrier.

Tuesday, September 7, 2010

Bathroom Renovation: Demolition

I hope everyone had a great holiday weekend! Ours was great! But let's just say that over at our house, "Labor Day" was incredibly labor intensive. David and I spent the weekend (besides Saturday- go Dawgs!) doing the bulk of the demo work on our master bathroom. While we love the incredible character of our sixty year old mid-century ranch, we weren't too excited to have work with mid-century plumbing, tiling, fixtures, etc. Needless to say, we just jumped right in and started tearing the bathroom apart.

Our first step was to get rid of all of the fixtures, including the built in towel racks, the toilet paper holder, several soap dishes, and all cabinet doors and drawers. As you can see, we had lots and lots and lots of cabinets (seriously- who has that many toiletries?!) to remove.


As soon as we started chipping, pulling and smashing the bathroom up, we both put on dust masks. We were a little worried about lead paint, since our house was built in 1952. It's likely that some portion of the bathroom was painted in a coat or two of the toxic stuff, so we thought we'd play it safe.

Next, we started actually pulling up the cabinets. And when I say "we," I am proud to say that I actually mean ME! Armed with a mallet, a hammer and a crowbar, I actually pulled up most of these cabinets while David worked on disconnecting the toilet and sink plumbing. Can I lift my arms today? Absolutely not. Was it worth it to smash up a bunch of old, ugly stuff? Absolutely.


Yes, I actually did that! Even with those ugly brown Crocs on! :) David had to jump in and help me with the last part of the cabinets, as it was built around the piping and I was a little nervous to tug on it too much for fear of busting a pipe. David sawed around what was left and removed it, piece by piece.

Oh, FYI, we tossed all the scrap wood out the window into a big pile on the side of the house (which is thankfully hidden by a grove of trees so our poor neighbors don't have to look at it!). We plan to haul all of the trash to the dump at the end of our project. By the way... the hardest part? In my opinion, removing the gigantic mirrors that covered both walls above the vanities. They were SO heavy and I was SO afraid they would shatter at any given moment during their move. Thankfully, we got them down okay and they're going up on Craigslist in search of a new home.


Next up? Time to remove that hideous, dirty yellow tile. We headed over to Home Depot and rented a demolition hammer to get the job done. Our local HD has an awesome tool rental section with a ton of options that are not too expensive. And it doesn't hurt that the guys who work in that department are incredibly helpful. Unfortunately, ripping up the tile with a demolition hammer isn't exactly a two man job, so my sweet husband took over this task. We knew that dust would be flying eve-ry-wh-ere, so we taped plastic over all of the vents, outlets, pipes, etc. We also taped plastic over the door frame. So how did David get in and out of the bathroom, you may ask? He didn't. Poor guy was stuck in there for about five hours, hammering away.

My view of the bubble boy.


There he is, my guy behind the bubble. At about six last night, he finished hammering all the tile up. And the poor guy was so exhausted, I told him that we could just leave the shoveling for tonight (which will also be a lot easier once all of the dust settles). So he slipped out of the plastic and we quickly sealed it back up. A little mess behind the bubble never hurt anyone. Here's what it looked like last night before bed (sorry- kind of blurry through the plastic!).


So there you have it! That was (most of) the demolition of our bathroom. All we have left in the demolition category is to shovel up all of the loose tile and knock down the closet walls. And figure out a way to remove the ridiculously large cast-iron tub that currently sits in the room. Okay, so maybe there is a lot left, but those "to do's" are definitely not as exciting as bubble boy! :) 

This project will definitely be slow-going. David and I are pretty busy at the end of the month and with our crazy job schedules, we can really only work on the house on weekends. Honestly, we're thinking of a time frame of two or three months. Lucky for us, we have another full bathroom right down the hall, so it's not like we're in desperate need to finish this. This week, we're finalizing the general layout of the new space and the plumbing plans. I'll share those with you as soon as they're finished! And please, please, share your renovation stories and advice- we need all the help we can get!

Thursday, September 2, 2010

These Are A Few of My Favorite Things

I thought I'd share a few of the things that are bringing a smile to my face right now. In fact, I've narrowed it down to my top five. So here they are....

1. Labor Day weekend
Ummmm can you say THREE. DAY. WEEKEND. Ever seen that Red Stripe commercial where the Jamaican guy yells out: "Hoo-ray beer!" ?? That's how I feel about Labor Day: "Hoo-ray day off of work!"

2. What comes after Labor Day weekend... FALL!
Hands down, autumn is the BEST season there is. What is not to love? Beautiful colors, crisp air, hiking, bonfires, my birthday... so many wonderful things! :) Not to mention decorating the house for fall. Don't worry, I made a trip to Hobby Lobby earlier this week and stocked up on fall decorating supplies. When I have a minute to breathe be creative, I'll definitely get my craft on and post some fall creations. Until then, I know all of you have been anxiously waiting for the September version of our new DIY calendar.


Wait, no one was anxiously waiting? Okay, so maybe I just wanted to share, because our September version looks a whole lot cuter than August, if I do say so myself!

3. College Football
Now, obviously half the highlight of fall is.... college football! And yesssss sir, it is that time of year again!  You can see the schedule on our calendar up there, so you know we're ready to go! Game day is my favorite holiday and that's the truth! David and I are both alumni of the one and only University of Georgia, so we are huge Dawg fans! Well, that and the fact that we grew up in SEC country and have been trained to be UGA fans since we were old enough to say "Sic 'Em!" The first game is this Saturday- go Dawgs!


4. Sprik Space
I was featured! Someone out there in the blog world actually thought my silly ideas were cool enough to put on their website! Can you believe it? What a fun moment for my two-month old blog! Please go check out Aimee's very cute "Brief Bits" post where she lists some of her favorite things she's seen over the week. And  don't forget to check out #16 on that list :) Thanks again, Aimee!

5. Demolition
Say whaaaat?  Yes! We are starting demolition on our master bathroom this weekend! I am super excited to finally get this renovation going! Haven't checked out our House Tour yet? Here are a few pictures to give you an idea of what our master bathroom currently looks like.


Yup, kind of yuck. And outdated. And hopefully filling up a dumpster by the end of this weekend!!  (PS. In case you were wondering, that is not our ship! It belonged to the previous owner- these are old pictures!) Next week, I'll share our demolition adventure, as well as our step by step game plan to redo this bathroom... without help. That's right. No professionals. No experts. Just me and David and hopefully some friends and family DIYing it all ourselves!

I know that all of you have as many things to feel blessed about, so feel free to share! Unless your blessings have anything to do with the Florida Gators or the Tennessee Vols, and then I don't want to hear them. ;) Have a great weekend!


Wednesday, September 1, 2010

DIY Picture Frame Update

A couple of weeks ago, I wrote this post about the DIY picture frame I made for my little sister, Callie, who was going away to college. I wanted something special for her to have in her dorm room, and this is what I came up with. All the project really involves is an open-backed frame, some picture hanging wire, and some clothespins. You can find the "how-to" details on the previous post.

This is Callie's final dorm room art product, where I added family pictures, a family recipe (French Toast!)
and some fun trinkets, all dolled up to match Callie's black and hot pink dorm room.

The final product hanging on Callie's dorm room wall!
As I was making the frame for Callie, I decided that I kind of wanted one too! Since funky black and hot pink aren't exactly the color schemes in my house, I ended up on the opposite side of the spectrum and went (surprise, surprise!) the au naturale route.

I found the perfect weathered wood frame at Hobby Lobby (50% off, of course!) and got to work, adding mainly pictures that my cousin took when she was in town a few weeks ago. I also added a few fun trinkets that are special to David and I.

And here's the finished product!


And some close up shots.


Besides the pictures, we added some things we picked up while we were on our visit to Savannah, Georgia last month. The fun hand-stiched bobble guy is actually stationary that was hand-made by a SCAD (Savannah College of Arts and Design) student! They have an entire store in downtown Savannah that is dedicated to selling the creations of the students, professors, and alumni of SCAD. For those of you who can't make it down to Savannah anytime soon, don't worry, they've got an online store posted here: SCAD Store.

The antique "r" button (for our last name) and the antique number pins (spelling out a number near & dear to our hearts) were also picked up in Savannah at The Paris Market. This store could hands-down be one of the coolest stores I've ever been in. You honestly feel like you are shopping at a Parisian antique flea market! It is super, super cool.


While I really love Callie's fun dorm room art, I am super in love with ours as well! The fun part is that the art is completely interchangeable, so we can mix it up whenever the urge strikes! Here's the frame up in the living room.


I love, love DIY (read: cheap!) wall art, so go ahead and please comment, share and link up to any new DIY art that you may have created lately!

Show and Tell Green The Girl Creative

Whatever Goes Wednesday on Someday Crafts

giveaways

LinkWithin